03 Mar 2024

For a while now I've been using Bottlerocket as the base OS for instances in the cloud (i.e. the AMI), instead of using Amazon Linux or Ubuntu etc. In our workload we don't really have much use for local storage until recently so I finally invested some time in figuring out how to actually make use of the local SSDs where available (usually this type of storage is called instance-store in AWS).

Some Bottlerocket concepts:

  • Minimalist, container-centric
  • There is no ssh or even a login shell by default
  • It provides 'host containers' that are not orchestrated (not part of kubernetes)
    • Control container - this is the one that allows us to connect via SSM
    • Admin container - this is the one that allow us to interact with the host container as root
    • The root file system is stored in /.bottlerocket/rootfs and there you can find /dev etc
  • You can launch bootstrap containers if you need to run tasks, instead of using user-data scripts

Typically you don't connect to these instances, but if you need to you can enable the control and admin containers in the user-data settings, connect to the control container and then type enter-admin-container. To connect to the control container use SSM (easiest is to do this via the EC2 web console, but also with aws ssm start-session --target <instanceid>))

You can learn more on bottlerocket's github, their concept overview and the FAQ (https://bottlerocket.dev/en/faq/)

Bottlerocket is configured by providing settings via user data in TOML format and what you provide will be merged with the defaults.

Configuring Bottlerocket in node groups

module "my-nodegroup" {
  source  = "terraform-aws-modules/eks/aws//modules/eks-managed-node-group"
  ...
  ami_type = "BOTTLEROCKET_ARM_64"
  platform = "bottlerocket"
  bootstrap_extra_args = <<-EOT
    [settings.host-containers.admin]
    enabled = true
    [settings.host-containers.control]
    enabled = true
    [settings.xxx.xxx]
    setting1 = "value"
    setting2 = "value"
    setting3 = true
  EOT
}

Configuring Bottlerocket in Karpenter

See the default values that Karpenter sets.

In Karpenter these days for AWS you define an EC2NodeClass that basically describes the image to be used and where it will be placed, and a NodePool that defines the hardware it will run in.

apiVersion: karpenter.k8s.aws/v1beta1
kind: EC2NodeClass
metadata:
  name: myproject
spec:
  amiFamily: Bottlerocket
  userData: |
    [settings.host-containers.admin]
    enabled = true
    [settings.host-containers.control]
    enabled = true
    [settings.xxx.xxx]
    setting1 = "value"
    setting2 = "value"
    setting3 = true
  subnetSelectorTerms:
    - tags:
        Name: "us-east-1a"
    - tags:
        Name: "us-east-1b"
  securityGroupSelectorTerms:
    - tags:
        karpenter.sh/discovery: "my-cluster"
  instanceProfile: eksctl-KarpenterNodeInstanceProfile-my-cluster

---

apiVersion: karpenter.sh/v1beta1
kind: NodePool
metadata:
  name: myproject
spec:
  limits:
    # limit how many instances this can actually create, we limit by cpu only
    cpu: 100
  template:
    spec:
      nodeClassRef:
        apiVersion: karpenter.k8s.aws/v1beta1
        kind: EC2NodeClass
        name: myproject
      requirements:
        - key: "karpenter.sh/capacity-type"
          operator: In
          values: ["spot"]
        - key: "kubernetes.io/arch"
          operator: In
          values: ["arm64"]
        - key: "karpenter.k8s.aws/instance-cpu"
          operator: In
          values: ["4", "8"]
        - key: "karpenter.k8s.aws/instance-generation"
          operator: Gt
          values: ["6"]
        - key: "karpenter.k8s.aws/instance-category"
          operator: In
          values: ["c", "m", "r"]
        # alternatively
        #- key: "node.kubernetes.io/instance-type"
        #  operator: In
        #  values:
        #  - "c6g.xlarge"
        #  - "m7g.xlarge"

This article discusses some options for pre-caching images that we won't do, but illustrates the architecture of Bottlerocket OS and how it can be combined with Karpenter.

Storage in Bottlerocket (permanent, ephemeral and local)

Bottlerocket operates with two default storage volumes: root and data. The root is read only and the data is used as persistent storage (EBS that will survive reboots) for non-Kubernetes containers that run inside the instance. The data container is 20 GB EBS drive and the root device is around 4 GB.

Check the Karpenter default volume configuration

Now the whole point of this post is to show how you can use the local SSD disks that machines often have but that Amazon makes particularly cumbersome to use. Many instances have local SSD storage that will show up inside the host as an extra unmounted device (eg /dev/nvme2n1). How do you make this available to Kubernetes in an automated way?

Kubernetes Storage local static provisioner

Learn more on the storage-local-static-provisioner github page and the getting started guide.

The way we expose local disks to kubernetes as resource is via a persistent storage class called 'fast-disks'. The local provisioner will allow creating of these resources of that type by finding local storage

  • It expects the host to have a folder called /mnt/fast-disks (configurable)
  • It expects there to be links to the actual device files of drives we want exposed
  • It is installed by generating a configuration file using helm and applying it with kubectl

Before going further we need to define a storage class that will be used to flag the new type of storage.

It looks like this and effectively does nothing (see the no-provisioner):

apiVersion: storage.k8s.io/v1
kind: StorageClass
metadata:
  name: fast-disks
provisioner: kubernetes.io/no-provisioner
volumeBindingMode: WaitForFirstConsumer
# Supported policies: Delete, Retain
reclaimPolicy: Delete
kubectl apply -f ./default_example_storageclass.yaml

Then setup the local provisioner daemonset that will handle it

# Generate the configuration file
helm repo add sig-storage-local-static-provisioner https://kubernetes-sigs.github.io/sig-storage-local-static-provisioner
helm template --debug sig-storage-local-static-provisioner/local-static-provisioner --version 2.0.0 --namespace myproject > local-volume-provisioner.generated.yaml

# edit local-volume-provisioner.generated.yaml if necessary
# optional: kubectl diff -f local-volume-provisioner.generated.yaml
kubectl apply -f local-volume-provisioner.generated.yaml

See more about the installation procedure

This creates a daemonset that runs in all instances.

These are some excerpts of what it creates:

The storage class - note that by default it will use shred.sh to initialize the disk, which is rather slow. You can change it to other methods. This will be done only on first boot.

# Source: local-static-provisioner/templates/configmap.yaml
apiVersion: v1
kind: ConfigMap
metadata:
  name: release-name-local-static-provisioner-config
  namespace: myproject
  labels:
    helm.sh/chart: local-static-provisioner-2.0.0
    app.kubernetes.io/name: local-static-provisioner
    app.kubernetes.io/managed-by: Helm
    app.kubernetes.io/instance: release-name
data:
  storageClassMap: |
    fast-disks:
      hostDir: /mnt/fast-disks
      mountDir: /mnt/fast-disks
      blockCleanerCommand:
        - "/scripts/shred.sh"
        - "2"
      volumeMode: Filesystem
      fsType: ext4
      namePattern: "*"

Joining local static provisioner, AWS instance store and Bottlerocket

Bootstrap containers have root access and boot with the root file system mounted.

You can create one like this, and publish to your own repository:

FROM alpine:latest
RUN apk add --no-cache util-linux
FROM alpine:latest
RUN echo '#!/bin/sh' > /script.sh \
    && echo 'mkdir -p /.bottlerocket/rootfs/mnt/fast-disks' >> /script.sh \
    && echo 'cd /.bottlerocket/rootfs/mnt/fast-disks' >> /script.sh \
    && echo 'for device in $(ls /.bottlerocket/rootfs/dev/nvme*n1); do' >> /script.sh \
    && echo '  base_device=$(basename $device)' >> /script.sh \
    && echo '  if ! mount | grep -q "$base_device"; then' >> /script.sh \
    && echo '    [ ! -e "./$base_device" ] && ln -s "../../dev/$base_device" "./$base_device"' >> /script.sh \
    && echo '  fi' >> /script.sh \
    && echo 'done' >> /script.sh \
    && echo 'ls -l /.bottlerocket/rootfs/mnt/fast-disks' >> /script.sh \
    && chmod +x /script.sh
CMD ["/script.sh"]

Add this to the Bottlerocket settings

[settings.bootstrap-containers.diskmounter]
essential = true
mode = "always"
source = "YOURACCOUNT.ecr.public.ecr.aws/YOURREPO:latest"

Caveat: node cleanup

By default, when you set this up if an instance dies (which in AWS can happen any minute) the persistent volume claim will remain.

Basically the life cycle is a bit like:

  • Pod is created that has a persistent storage claim of a fast-disk
  • This is allocated in one of the instances
  • Once it is assigned, the pod will be assigned to that instance
  • If the instance dies, the pod is still assigned to that specific instance and deleting it won't fix it

This will manifest as an error about the pod not being able to find nodeinfo for the now defunct node.

This cleaning process is achieved by the node-cleanup-controller

To set it up:

apiVersion: apps/v1
kind: Deployment
...
    spec:
...
      containers:
      - name: local-volume-node-cleanup-controller
        image: gcr.io/k8s-staging-sig-storage/local-volume-node-cleanup:canary
        args:
          - "--storageclass-names=fast-disks"
          - "--pvc-deletion-delay=60s"
          - "--stale-pv-discovery-interval=10s"
        ports:
          - name: metrics
            containerPort: 8080

Now apply both deployment and permissions

kubectl apply -f ./deployment.yaml
kubectl apply -f ./permissions.yaml

You will end up with

  • A new Storage class called 'fast-disks'
  • The CleanupController looks for Local Persistent Volumes that have a NodeAffinity to a deleted Node. When it finds such a PV, it starts a timer to wait and see if the deleted Node comes back up again. If at the end of the timer, the Node is not back up, the PVC bound to that PV is deleted. The PV is deleted in the next step.
  • The Deleter looks for Local PVs with a NodeAffinity to deleted Nodes. When it finds such a PV it deletes the PV if (and only if) the PV's status is Available or if its status is Released and it has a Delete reclaim policy.
(more...)
details

17 Sep 2023

A manouvre used since biblical times... Maniobra usada desde tiempos bíblicos...

(more...)
details

02 Oct 2022

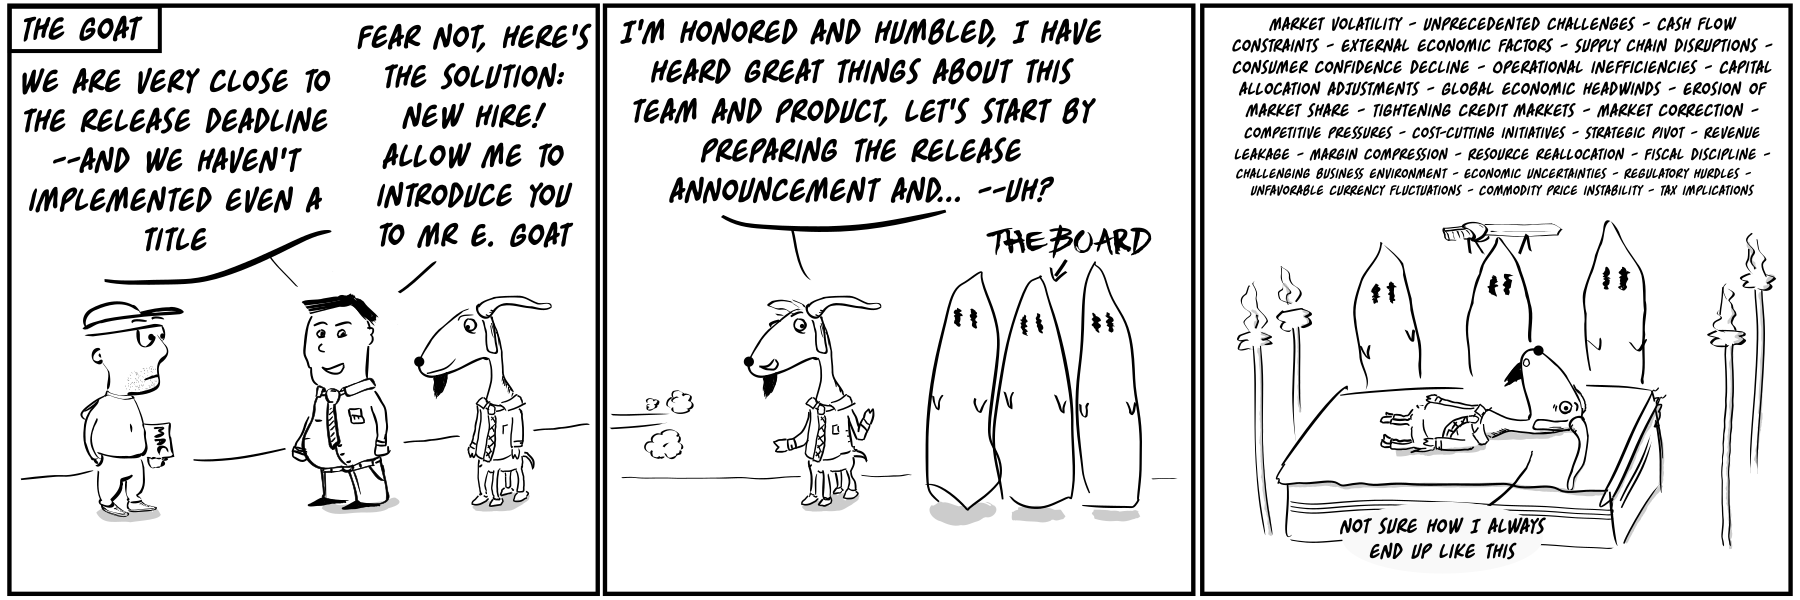
I set up a local kubernetes cluster using microk8s just as a development/home cluster and as part of it I ended up connecting to the kubernetes dashboard application using a service account token, as recommended

A silly drawing of Superkube

$ microk8s kubectl create token default
(...token output...)

This process lead me to a few questions:

  • What is that token?
  • Where does it come from?
  • Where is it stored?
  • Does it expire?

Essentially, "wait how does the whole token authentication thing work?"

Token types

So far we have dealt with two token types:

  1. We have static tokens, like the one we added in the kube config file. This token is equivalent to a user:password pair. If exposed it could be used forever to act as that user.
    • These are either stored as secrets or via some other mechanism
    • In microk8s there are some credentials created during installation, including the admin user we have been using. This can be found in /var/snap/microk8s/current under credentials/known_tokens.csv. Changing the token can be done by editing the file.
  2. Then we have temporary tokens, like the one we used for the dashboard access

Now, let's think about those... what is a temporary token? where are they stored? how do they expire? Those are the kind of questions I like to dig in to learn about the internals, and I end up finding a lot of this is implemented in a perfectly reasonable and standards-based way.

Inspecting a temporary token

As usual:

There we see:

  • The created token is a signed JSON Web Token (JWT)
  • The signed JWT can be used as a bearer token to authenticate as thegiven service account

Now, let's take our token and inspect it - pasting it into jwt.io to see its content (this is safe as long as you don't expose your cluster anywhere):

{
  "alg": "RS256",
  "kid": "_h3i-pvtWSsSXXVyXxxxxxxxxxxxxxxx"
}

{
  "aud": [
    "https://kubernetes.default.svc"
  ],
  "exp": 1664705605,
  "iat": 1664702005,
  "iss": "https://kubernetes.default.svc",
  "kubernetes.io": {
    "namespace": "default",
    "serviceaccount": {
      "name": "default",
      "uid": "755e1766-e817-xxxx-xxxx-xxxxxxxxxxxx"
    }
  },
  "nbf": 1664702005,
  "sub": "system:serviceaccount:default:default"
}
  • The aud parameter indicates the audience, in this case kubernetes
  • The sub indicates the 'subject' (user, service account, etc). When we created the token we didn't specify a service account, which means it used the 'default' service account (not great practice but hey we are starting)
    • This means the authentication request is coming from system:serviceaccount:default:default
    • You can take a look at this account with kubectl get sa default -o yaml
  • The date parameters define the validity period: "nbf": 1664702005 (not before), "iat": 1664702005 (issued at) and "exp": 1664705605 (expiry) which you can quickly convert to a date with:
$ date -d@"1664702005"
Sun  2 Oct 10:13:25 BST 2022
$ date -d@"1664705605"
Sun  2 Oct 11:13:25 BST 2022

How can I use this token?

Any client application we give the token to will be sending an HTTPS request to the API server with a header set to Authentication: Bearer <token>. That's all is needed. Any requests will then be approved/rejected based on the permissions of that account.

If you want to test a particular call, you can use the token with for example:

kubectl --token="xxxxxxxxxxxxxx" get pods --all-namespaces

And finally, where is it stored?

  • The token is not stored as a secret and it's not directly linked from the service account object
  • In fact, the token is not stored anywhere in kubernetes, it's validated from the signature
  • Secrets don't expire but these tokens do (an hour as seen above in the JWT token itself)

As usual, you will be able to dig into the Dashboard project itself, for instance here you have alternative access methods

A final note on temporary tokens: they do provide advantages in limiting the scope of attack as they will expire but you will still need to associate them to limited users or service accounts with limited restrictions, something I haven't gone into yet and we have been using the default service account. For example, if the temporary account is captured it can be used to create permanent accounts/secrets.

(more...)
details

01 Oct 2022

But why?

Whatever you think about Kubernetes, it is here to stay. At work it's replaced all our custom orchestration and ECS usage. It solves infrastructure problems in a common way that most Cloud providers have agreed to, which is no small feat.

So why would you want to install it locally anyway? For work your company will most likely provide you access to a cluster and give you a set of credentials that somewhat limit what you can do. Depending on your interests that won't be enough to properly learn about what is going on under the hood. Getting familiar with how Kubernetes stores containers, container logs, how networking is handled, DNS resolution, load balancing etc will help remove a huge barrier.
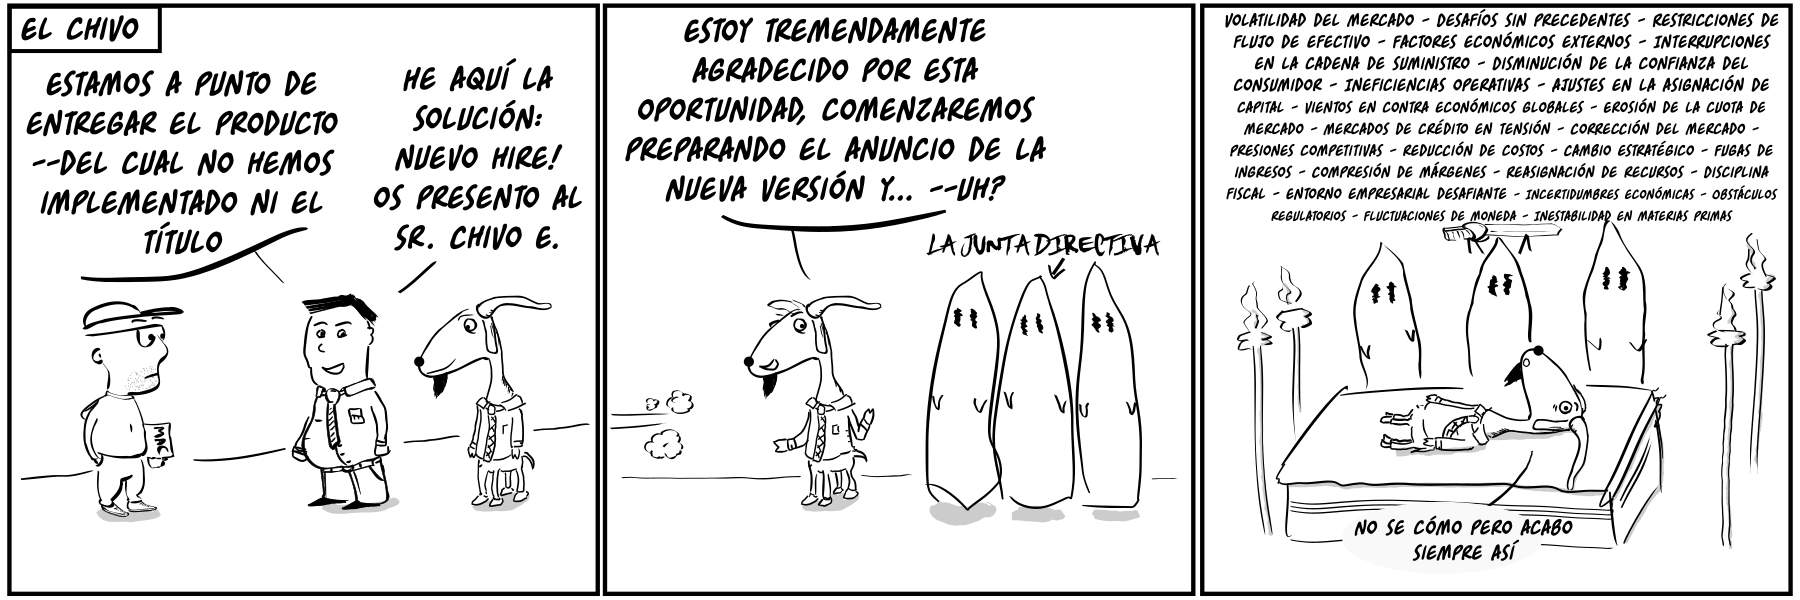
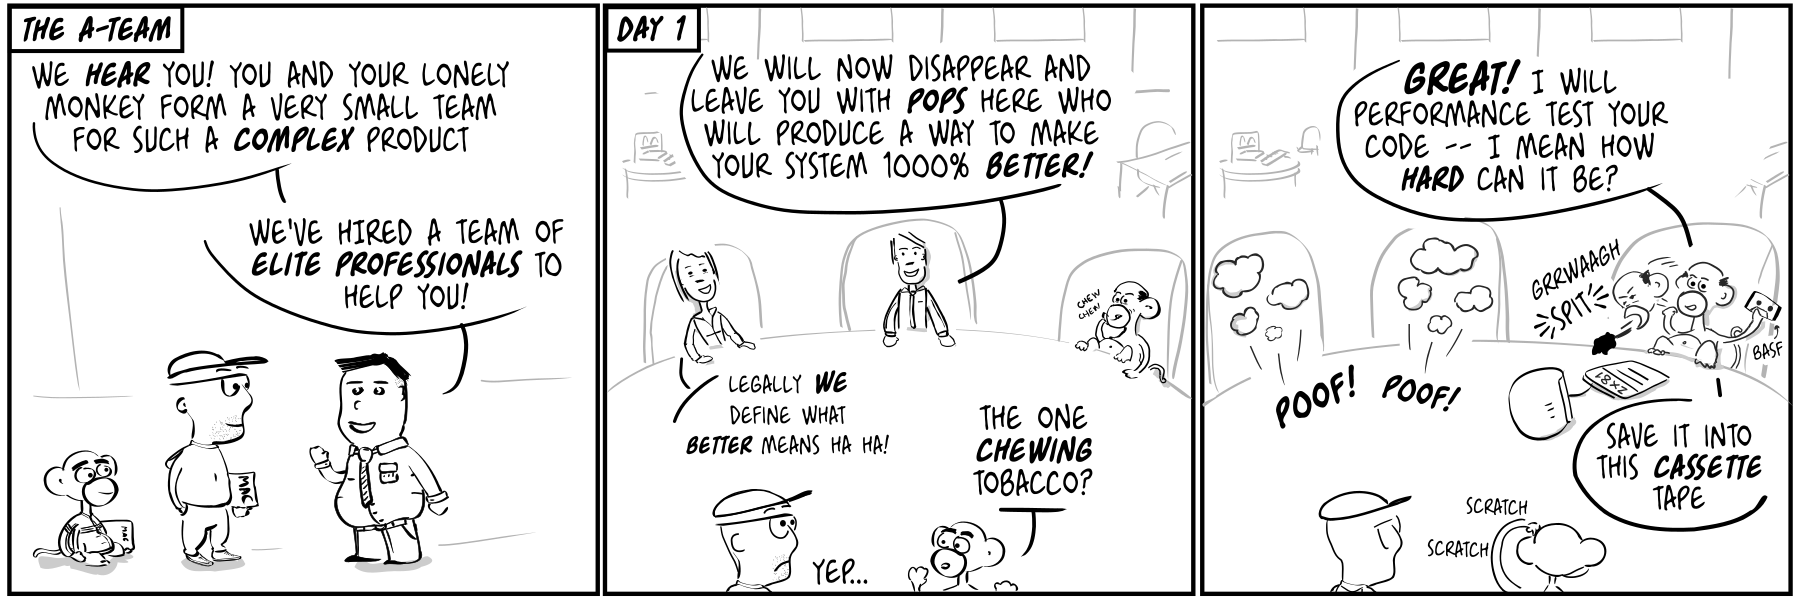
The best thing I can say about Kubernetes is that when you dig into it, everything makes sense and turns out to be relatively simple. You will see that most tasks are actually performed by a container, one that has parameters, logs and a github repo somewhere you can check. Your DNS resolution is not working? Well then take a look at "kubectl -n kube-system logs coredns-d489fb88-n7q9p", check the configuration in "-n kube-system get deployments coredns -o yaml", proxy or port-forward to it, check the metrics...

In my particular case I also always have a bunch of code I need to run, scripts to aggregate and publish things, renew my Letsencrypt certificates, update podcast and RSS services, installed tools like Grocy and others. Over the years I've tried various solutions to handle all of this. Currently I have a bunch of scripts running on my main machine (Linux) that I usually have always running, some of those spawning containers (to ease dependency management, sometimes it's not completely under my control) and other tasks are done by my Synology DS.

For me, having kubernetes seems like a logical step even if it's just to see if this solution will age better over time. I like the declarative nature of the YAML configuration and the relative isolation of having Dockerfiles with their own minimal needs defined.

But let's be clear, for most non developers this is a pretty silly thing to do!

Let's reuse some hardware

There are multiple ways to have a local kubernetes cluster. One of the most popular is minikube but this time we are going to try the Microk8s offer from Canonical (Ubuntu) running in a spare Linux box (rather than a VM).

Microk8s is a developer-orientated kubernetes distribution. You should most certainly not use it as your day to day driver but it's a good option to play with Kubernetes without getting too lost in the actual setup

Do you have a spare computer somewhere? I have an old Mac Mini I was using as my main OS X (for iOS builds) and as a secondary backup system. Now it has been superseded by a much better Intel Mac Mini I kind friend gave me, leaving me with a machine that is too nice to just shelve but too cumbersome to maintain as another Mac OS X machine (it won't be plugged in to a monitor most of the time).

  • I installed a minimal Ubuntu 22.04.1 LTS on it (Server edition)
  • Cpu according to /proc/cpuinfo is i5-4278U CPU @ 2.60GHz
  • RAM according to /proc/raminfo is 16GB of RAM
  • And according to hdparm -I I have two SSDs since some time ago I replaced the old HDD with a spare SDD: Samsung SSD 860 EVO 500GB and the original APPLE SSD SM0128F
    • I decided to mount the smaller Apple SSD as ext4 in / and the bigger 500GB one as zfs in a separate mountpoint called /main. Mostly because I have tendency to reinstall the whole OS but like to keep the ZFS partition between installs.

Setting up microk8s

Once the Mac Mini linux installation was setup (nothing extra needed to do there), I enabled SSH and the remaining setup was done from inside SSH sessions.

Installation didn't start very promising as it failed the first time, but re-running did finish, following the official installation guide:

$ sudo snap install microk8s --classic
microk8s (1.25/stable) v1.25.2 from Canonical✓ installed

For ease of use I've given my own user access to it with:

sudo usermod -a -G microk8s osuka
sudo chown -f -R osuka ~/.kube
# exiting the ssh session and logging in again is needed at this point

That you have the correct permissions can be checked by running microk8s status --wait-ready As per the guide, enable some services:

$ microk8s status
high-availability: no
  datastore master nodes: 127.0.0.1:19001
  datastore standby nodes: none
addons:
  enabled:
    ha-cluster           # (core) Configure high availability on the current node
    helm                 # (core) Helm - the package manager for Kubernetes
    helm3                # (core) Helm 3 - the package manager for Kubernetes
    metrics-server       # (core) K8s Metrics Server for API access to service metrics
  disabled:
    cert-manager         # (core) Cloud native certificate management
    community            # (core) The community addons repository
    dashboard            # (core) The Kubernetes dashboard
    ...

We activate the following services, by running microk8s enable XXXX for each one:

  • dashboard: Provides us with a web UI to check the status of the luster. See more on github
  • dns: installs coredns which will allow us to have cluster-local DNS resolution
  • registry: installs a private container registry where we can push our images

We enable also the "community" services with microk8s enable community which gives us additional services we can enable. From the community, we install

  • istio: this creates a service mesh which provides load balancing, service-to-service authentication and monitoring on top of existing services, see their docs

Make microk8s kubectl the default command to run:

  • add alias mkctl="microk8s kubectl"
  • this is just the standard kubectl, just provided via microk8s so we on't need to install it separately - we can still use kubectl from other machines

Let's use it remotely

Access the cluster itself with kubectl

The last thing I want is to have yet another computer I have to keep connecting to a display so this installation will be used remotely. Also I don't really want to be ssh'ing inside of it just to run kubectl commands.

From inside the ssh session, check stuff is running:

$ mkctl get pods --all-namespaces
NAMESPACE            NAME                                         READY   STATUS    RESTARTS   AGE
kube-system          kubernetes-dashboard-74b66d7f9c-6ngts        1/1     Running   0          18m
kube-system          dashboard-metrics-scraper-64bcc67c9c-pth8h   1/1     Running   0          18m
kube-system          metrics-server-6b6844c455-5t85g              1/1     Running   0          19m
...

There's quite a bit of documentation on how to do most common tasks, check the how to section of the Microk8s site. To configure access:

  • Expose configuration
$ microk8s config
apiVersion: v1
clusters:
- cluster:
    certificate-authority-data: LS0tLS1CRUdJTiBDRV... # (certificate)
    server: https://192.168.x.x:16443   # (ip in local network)
  name: microk8s-cluster
contexts:
- context:
    cluster: microk8s-cluster
    user: admin
  name: microk8s
current-context: microk8s
kind: Config
preferences: {}
users:
- name: admin
  user:
    token: WDBySG1.......  # direct token authentication

At some point we will create users but for initial development tasks all we need is to concatenate the contents of this configuration into our ~/.kube/config file (or create it if it's the first time using kubectl).

After doing this, all kubectl commands will work as usual. I've renamed my context to 'minion':

❯ kubectl config use-context minion
❯ kubectl get pods --all-namespaces

More details for this specific step in the official howto.

Access the dashboard

Since we haven't enabled any other mechanism, to access the dashboard you will need a token. At this point you could use the same token you have in .kube/config, but the recommended way is to create a temporary token instead:

$ kubectl create token default
... a token is printed
$ kubectl port-forward -n kube-system service/kubernetes-dashboard 10443:443

Then connect to https://localhost:10443 and paste the output from the first command. See the next post for an explanation of the token used there.

(more...)
details

07 Jul 2022

I used python but this is arguably even worse in Javascript/Typescript. Sorry I mean JavaScript. It turned out the problem wasn't java it was the people (also: are katas a type of defensive programming?) Aquí he usado python pero esto pasa igual o más en Javascript/Typescript. Quiero decir JavaScript. Al final resultó que el problema no era java si no la gente (por cierto: son las katas un tipo de programación defensiva?)

(more...)
details

19 Jun 2022

Chewing tobacco in a work meeting with your clients, the ultimate power move. Mascar tabaco en una reunión de trabajo frente a tus clients, el power move definitivo.

(more...)
details

20 Jun 2021

No matter what your pet may think of you, wear your mask don't be stupid. Independientemente de lo que tu mascota pueda pensar de ti, ponte la máscara no seas estúpido.

(more...)
details

14 Oct 2020

When transmitting complex information I find having some kind of diagram extremely helpful. Sometimes they are there just to have something to look at and point, sometimes they are key to following a complex flow.

Over the years of trying lots of different tools, still seems to me that what I would call 'hand drawn' diagrams are best - but I don't mean actually hand drawn, I'm quite bad at whiteboard drawing but give me a tool like Omnigraffle and I'll make the nicest diagrams. I'll throw in some pastel colors even.

The issue is that integrating that with documentation when most of the documentation is in markdown is getting very annoying: you have to export the diagram as an image, save it somewhere and then insert a reference to it inside the markdown document.

It's pretty much impossible to do a decent version control on those, other than replacing a binary blow by another binary blob.

WARNING: If you read this post in an RSS reader it's not going to look pretty - diagrams are rendered client-side, you'll need to go to the website.

Mermaid

Many times all I want is to draw a small simple figure to help the narrative or to more effectively highlight some point, something that belongs to the document. Enter mermaidjs, that lets you embed diagrams by writing a description of them. Here is a simple example diagram, you will have to enclose it in three backticks and the word mermaid (I can't seem to be able to escape that in a way that works in jekyll):

sequenceDiagram
    Mobile Device->>Server: Request
    Server->>Cache: get [x-something]
    Cache-->>Server: null || contents

Renders:

sequenceDiagram Mobile Device->>Server: Request Server->>Cache: get [x-something] Cache-->>Server: null || contents

The great thing about this is that now I can edit the source file for this post and open a preview in Visual Studio Code (by installing the extension Markdown Preview Mermaid Support) that shows me what it would look like.

Here are some more examples, there is a ton of diagram types:

pie title When to use a pie chart "Never" : 235 "When lying about your data" : 85 "When hungry" : 15

I can see myself writing a quick gantt diagram that I can store as part of my project's code, and then export as PDF when needed with the "Markdown PDF: Export (pdf)" command of the Markdown PDF plugin.

gantt title A Gantt Diagram: This is not how things work in reality but you need something dateFormat YYYY-MM-DD section Governing Planning :done, planning, 2013-12-21, 5d Budget allocation :done, budget, after planning, 5d section Backend API definition :active, api-interface, 2014-01-01, 5d API implementation :api-implementation, after api-interface, 10d E2E testing :e2e, after api-implementation, 3d Announcing it's all done and leaving the company: after api-interface, 3d section Frontend Implementation :fe-implementation, after api-interface branding, 12d Implementation extension : fe-again, after fe-implementation we-didnt-think-about-that, 12d section Design Branding :active, branding, after budget, 12d We didn't think about that : we-didnt-think-about-that, after api-implementation, 24d

You can do pretty interesting things in the gantt charts, multiple dependencies etc

erDiagram CUSTOMER ||--o{ ORDER : places ORDER ||--|{ LINE-ITEM : contains CUSTOMER }|..|{ DELIVERY-ADDRESS : uses

You can have class diagrams

classDiagram
      Animal <|-- Duck
      Animal <|-- Fish
      Animal <|-- Zebra
      class Duck{
          +String beakColor
          +swim()
          +quack()
      }
      ...
classDiagram Animal <|-- Duck Animal <|-- Fish Animal <|-- Zebra Animal : +int age Animal : +String gender Animal: +isMammal() Animal: +mate() class Duck{ +String beakColor +swim() +quack() } class Fish{ -int sizeInFeet -canEat() } class Zebra{ +bool is_wild +run() }

You can have nice state diagrams

stateDiagram
    [*] --> State1
    State3 --> State4
    State1 --> State2
    State3 --> [*]
    State2 --> State4
    State2 --> State3: Conked

or with the newer plugin:

stateDiagram-v2
    [*] --> State1
    state fork_state <<fork>>
        [*] --> fork_state
        fork_state --> State1
        fork_state --> State3
    ...
stateDiagram-v2 [*] --> State1 state fork_state <> [*] --> fork_state fork_state --> State1 fork_state --> State3 State3 --> State4 State1: The state with a note note right of State1 Important information! You can write notes. end note State1 --> State2 note left of State2 : This is the note to the left. State2 --> Active state Active { [*] --> NumLockOff NumLockOff --> NumLockOn : EvNumLockPressed NumLockOn --> NumLockOff : EvNumLockPressed -- [*] --> ScrollLockOff ScrollLockOff --> ScrollLockOn : EvCapsLockPressed ScrollLockOn --> ScrollLockOff : EvCapsLockPressed } state join_state <> State4 --> join_state Active --> join_state join_state --> [*]
stateDiagram [*] --> State1 State3 --> State4 State1 --> State2 State3 --> [*] State2 --> State4 State2 --> State3: Conked

Entity relationship diagrams:

graph LR A[Hard edge] -->|Link text| B(Round edge) B --> C{Decision} C -->|One| D[Result one] C -->|Two| E[Result two]

Caveats

One thing to note is the different diagram plugins are almost independent applications and have subtle syntax differences: for instance you must use quotes in pie charts, but not in gantt.

The "Markdown: Open preview to the side" command on visual studio code right now works but has a very annoying refresh effect on the document you are typing in making it mostly unusable. You will be better of just opening previews that refresh only when you focus them using the "Markdown: Open Preview" command.

Integration with Jekyll

There's no real integration with Jekyll, you just add the library to your layout and then embed a <div> which automatically gets expanded client-side by the library:

<div class="mermaid">
sequenceDiagram
    Mobile Device->>Server: Request
    Server->>Cache: get [x-something]
    Cache-->>Server: null || contents
</div>

To add the library (quite a hefty library at 800K for the minified version, but for a site like this it's acceptable):

mkdir lib
cd lib
curl -O https://raw.githubusercontent.com/mermaid-js/mermaid/develop/dist/mermaid.min.js

To add it to your layout, edit for instance _layouts/default.html:

...
<body>
...
<script src="/yay/lib/mermaid.min.js"></script>
</body>

Customization

One of the greatest things about mermaid is that you can tweak most of it using just CSS and you can add event listeners to make the diagrams more interactive. Check the excellent documentation

(more...)
details

27 Aug 2020

I've been a very big fan of small Wacom tablets as a replacement for a mouse. I'll go through my current setup for Linux in case it can help anyone out there.

I started using a Wacom tablet for drawing but found it an excellent replacement for a mouse and moved to exclusive use when I started having symptons of RSI. The change from having the wrist on top of a mouse to having it gripping a pen made a big difference and my problems went away.

When I started using macbooks this became almost a non issue since the trackpad (on OS X) removes a lot of the stress points, in particular if you enable tap to click, tap with two fingers to right click and three finger drag.

Now I find myself on desktop PCs running Linux most of the time so I went back to using it as my main device, tweaking it to my liking. I have compiled my tweaks and hacks here, currently all is tested on a relatively old Wacom Intuos pen & touch small tablet (CTH-480).

Oh and kudos to Jason Gerecke the maintainer of the linuxwacom driver, such an essential but slightly thankless job (and Wacom for supporting him).

The basics

Luckily most distros these days detect Wacom tablets without any hassle and provide even a tool that will help you do some simple mappings.

First of all you'll need to find the ID of the device you want to modify, and you'll need to have xsetwacom installed (part of xserver-xorg-input-wacom, normally installed by default).

In my case:

xsetwacom --list devices

 Wacom Intuos PT S Finger touch    id: 13  type: TOUCH
 Wacom Intuos PT S Pad pad         id: 14  type: PAD
 Wacom Intuos PT S Pen eraser      id: 17  type: ERASER
 Wacom Intuos PT S Pen stylus      id: 16  type: STYLUS

The following commands can use the name of the device or the id number, I'll use the name to make it easier to read.

Absolute positioning

This is a must, trying to use the pen as if it was a trackpad just doesn't function in an usable way. What you want is to map a point on the tablet to a point on the screen. This allows you to fly from one corner of the screen to the other faster than a trackpad could do.

For almost all distros you can switch this on via a UI, but if you don't have it, you can do it manually, for my case:

xsetwacom --set "Wacom Intuos PT S Pen stylus" Mode Absolute
xsetwacom --set "Wacom Intuos PT S Pen eraser" Mode Absolute

Aspect ratio

There is one subtle but very big problem I have noticed as the aspect ratio of my monitors have diverged from the aspect ratio of the tablet over time.

If your tablet proportions don't match the proportions of the screen it will be impossible to draw properly, this is painfully evident on an Ultrawide screen: you'll draw a circle but it will show as an oval. The brain is able to more or less adjust to that and you may be able to manage it but it's a very frustrating experience.

For my case I have written a small script that will calculate the aspect ratio of the screen and map the tablet to it.

# if you have more than one monitor you can specify which one to use by
# adding a --display option to the xrandr call
s_w=`xrandr | grep -w connected  | awk -F'[ \+]' '{print $4}' | sed 's/x/ /' | awk '{print $1}'`
s_h=`xrandr | grep -w connected  | awk -F'[ \+]' '{print $4}' | sed 's/x/ /' | awk '{print $2}'`

ratio=`echo "${s_h}/${s_w}" | bc -l`

echo "Screen detected: ${s_w}x${s_h}"
for device in 'Wacom Intuos PT S Pen stylus' 'Wacom Intuos PT S Pen eraser' ; do
  echo ""
  echo "${device}:"
  xsetwacom set "$device" ResetArea
  area=`xsetwacom get "$device" area | awk '{print $3,$4}'`
  w=`echo ${area} | awk '{print $1}'`
  h=`echo ${area} | awk '{print $2}'`
  hn=`echo "${w}*${ratio}" | bc -l`
  hn=`printf %.0f "${hn}"`
  echo "  Area ${w}x${h} ==> ${w}x${hn}"
  xsetwacom set "$device" area 0 0 ${w} ${hn}
done

Fix the jitter

My hand is not particularly steady and I find that if I try to keep it still I will get tiny movements (jitter). These two parameters make it less sensitive. You can play with the values. This seems to work for my Intuos S.

xsetwacom --set "Wacom Intuos PT S Pen stylus" Suppress 10
xsetwacom --set "Wacom Intuos PT S Pen stylus" RawSample 9
xsetwacom --set "Wacom Intuos PT S Pen eraser" RawSample 9
xsetwacom --set "Wacom Intuos PT S Pen eraser" Suppress 10

Mapping of the tablet buttons

There are some buttons on the tablet. I find the most useful thing to do is to map them to mouse buttons so that I can click more precisely. I find hovering over a selection and using the other hand to press the buttons makes me more precise. You can also map them to any key or combination of keys.

# the pad of my tablet has 4 buttons
# the mapping is a bit weird because Xinput reserves some buttons
# https://github.com/linuxwacom/xf86-input-wacom/wiki/Tablet-Configuration-1%3A-xsetwacom-and-xorg.conf
#
#  [ button 3 ]               [ button 9 ]
#  [ button 1 ]               [ button 8 ]
#
xsetwacom set "Wacom Intuos PT S Pad pad" Button 9 "key +ctrl z -ctrl"  # undo
xsetwacom set "Wacom Intuos PT S Pad pad" Button 8 2  # middle button
xsetwacom set "Wacom Intuos PT S Pad pad" button 1 1  # mouse click
xsetwacom set "Wacom Intuos PT S Pad pad" button 3 2  # middle button

You can use trial and error to find which buttons correspond to which numbers. Note the mapping for the 'undo' functionality, it's equivalent to saying "press control, while holding it press z, then release control"

Mapping of pen buttons

You can map the buttons on the pen itself to various functions.

For years one feature I missed was the ability to scroll just using the pen. The way this works is I press on the button on the side of the pen (which is very ergonomic) and then press with the pen on the tablet and move up and down. Works like a charm as a relaxed way of scrolling. This is called "pan scroll", I have seen it called "drag to scroll" too and has worked in Linux for a couple of years now and it's implemented as a button mapping.

# pan scroll (press lower button + click and drag to scroll)
xsetwacom --set "Wacom Intuos PT S Pen stylus" button 2 "pan"
xsetwacom --set "Wacom Intuos PT S Pen stylus" "PanScrollThreshold" 200

I leave the other buttons as they are, which is the tip of the button acts as a 'left click' and the second button on the side acts as a right click. This particular pen can also be used as an eraser - so you can change the eraser mapping too. Defaults work fine for me.

Touch and multi-touch (fusuma)

Without doing anything you get functional trackpad functionality on Wacom touch models. For mine you get standard movement, tap to click, tap with two fingers to right click and what I can best describe as "tap + release + tap again and move" to select or drag, plus scrolling by using two fingers up and down the tablet. Some distributions enable also going forwards and backwards in browsers by sliding both fingers left or right, while the most common case seems to enable scrolling left and right.

There's a few multi touch frameworks you can use to extend what's possible. I'm currently using fusuma, I simply followed the instructions to set it up and then launch it as part of my window manager startup. It can do a lot more than what I need so my configuration is very simple:

$ cat ~/.config/fusuma/config.yml
swipe:
  3:
    left:
      sendkey: "LEFTALT+RIGHT" # History forward
    right:
      sendkey: "LEFTALT+LEFT" # History back
    up:
      sendkey: "LEFTMETA" # Activity
  4:
    left:
      sendkey: "LEFTALT+LEFTMETA+LEFT"
    right:
      sendkey: "LEFTALT+LEFTMETA+RIGHT"
pinch:
  in:
    command: "xdotool keydown ctrl click 4 keyup ctrl" # Zoom in
  out:
    command: "xdotool keydown ctrl click 5 keyup ctrl" # Zoom out

Basically I use four fingers to move between workspaces (I have mapped those keys in my window manager to switch workspaces) and three fingers to go back/forwards in browsers. I have pinch configured but it's not very practical to be honest.

Here you can really play with whatever fits best with your preferences and window manager. Note that you can issue extended complicated commands via xdotool in a similar way to what linuxwacom can already do by itself.

That's it. This is what works for me so far, feel free to ping me if you get stuck setting up something.

(more...)
details

02 Apr 2020

For some, things haven't changed that much.

(more...)
details